Not Enough Space to Install a macOS Update? Fix It Safely
On this page
- How much free space does a macOS update need?
- Why the installer says no when Finder says yes
- Step 1: empty the Trash
- Step 2: delete Time Machine local snapshots
- Step 3: restart your Mac
- Step 4: remove old installers and update files
- Step 5: free larger amounts if you still need space
- Step 6: move big files to an external drive
- Check the update size in Software Update
- A downloaded update waiting to install takes space
- Upgrading from a much older version
- What not to do
- If the update still fails
- Keep enough space for future updates
- How Purgy makes room for a macOS update
- Questions people ask about update space
Quick answer: Empty the Trash, delete Time Machine local snapshots with tmutil thinlocalsnapshots / 999999999999 4, and restart. That turns "purgeable" space into real free space, which is what the installer checks.
If you still need more, remove old iPhone backups, old macOS installers and large downloads, then try the update again.
Few things are more annoying than an update that will not install because of space, especially when Finder says you have plenty available. The cause is usually simple, and so is the fix.
macOS needs a lot of free working space during an update: room to download it, unpack it and keep a safe copy of the old system until the new one is ready. This guide shows how to make that room without deleting anything you need.
How much free space does a macOS update need?
It depends on the update and on your current version. As a rough guide:
- Small updates within the same version: often need a few gigabytes free.
- Major upgrades to a new version: often need 25 GB or more free, and more if you are upgrading from a much older version.
Software Update shows the download size, but the space needed to install is larger than the download. Aim for at least twice the download size, plus a healthy margin.
Why the installer says no when Finder says yes
Finder's "Available" figure includes purgeable space. That is space macOS can free on its own, such as iCloud copies and Time Machine snapshots.
Installers often check the space that is free right now instead. If much of your "available" space is purgeable, the installer sees far less than Finder does.
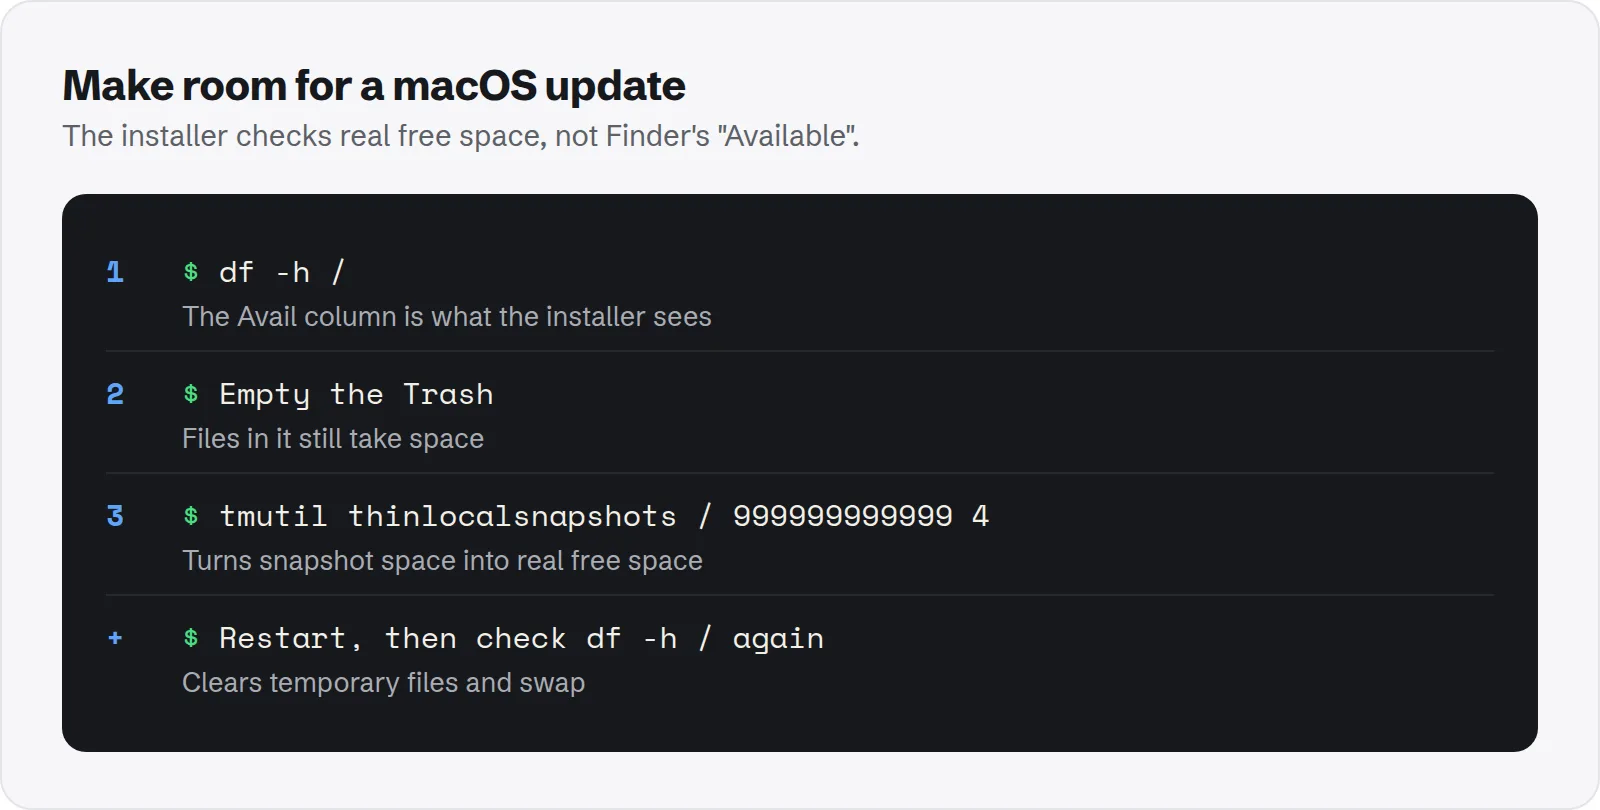
To see the number the installer cares about, run this in Terminal:
df -h /The Avail column is your real free space. Our guide to purgeable storage on Mac explains the difference in detail.
Step 1: empty the Trash
Files in the Trash still take up space until you empty it. It is the quickest win and often forgotten.
Right-click the Trash in the Dock and choose Empty Trash. Check it first for anything you still meant to keep. If you have external drives connected, they have their own Trash, which empties at the same time.
Step 2: delete Time Machine local snapshots
Local snapshots are often the main reason the installer sees less space than Finder. Deleting them does not touch your backups on your backup drive.
tmutil listlocalsnapshots /
tmutil thinlocalsnapshots / 999999999999 4
The first command lists them. The second asks macOS to free as much snapshot space as it can. See how to delete Time Machine local snapshots for more options.
Step 3: restart your Mac
A restart clears temporary files and shrinks swap, which can free several gigabytes. Then check df -h / again before you retry the update.
Apple also notes that starting up in Safe Mode clears certain system caches, which can make enough space for a task like installing an update. Its guide to freeing up storage space on Mac describes this.
Step 4: remove old installers and update files
Old installers are large and easy to forget. They are safe to delete once you no longer need them.
- Old macOS installers: apps named "Install macOS …" in your Applications folder. Each is often over 12 GB.
- Disk images:
.dmgfiles in Downloads for apps you already installed. - iPhone and iPad update files: listed under iOS Files in Storage settings.
Step 5: free larger amounts if you still need space
If you need tens of gigabytes more, look at the big categories. These usually free the most space with little risk.
- Old iPhone backups: see how to delete old iPhone backups.
- Messages attachments: see how to clear Messages attachments.
- App caches: see whether ~/Library/Caches is safe to delete.
- Large files in Downloads: sort by size in Finder and remove what you no longer need.
If you cannot find where the space went, our guide to finding hidden storage walks through it step by step.
Step 6: move big files to an external drive
If you have large files you want to keep, such as video projects or old photo exports, move them to an external drive for the update. You can bring them back afterwards if you like.
Copy them first, check the copy opens on the external drive, then delete the originals from your Mac. Never move app data or libraries this way without checking the app supports it.
Check the update size in Software Update
Before you start cleaning, find out how much the update actually needs. Open System Settings > General > Software Update.
Click More info or the info button next to the update to see its size. Use that number to set a target: free at least twice that much, plus a few gigabytes extra.
A downloaded update waiting to install takes space
macOS can download updates in the background before you install them. A downloaded update sits on your disk, often using several gigabytes, until it is installed.
If an update is ready but you are not installing it yet, that space is taken. Installing it, or letting macOS finish, usually gives most of it back afterwards.
Upgrading from a much older version
If your Mac is several versions behind, a major upgrade can need more space than usual, because there is more to change. Start with more free space than you think you need.
If Software Update does not offer the version you want, check the App Store for the full installer. Very old Macs may not support the newest macOS at all; Apple lists compatible models for each version.
What not to do
When an update will not install, some shortcuts make things worse. Avoid these.
- Do not delete system folders to make room. Files in
/Systemand/privatebelong to macOS. - Do not try to install the update to an external drive. Updates install on your startup disk.
- Do not interrupt an update that has started. If it fails, it usually rolls back safely; forcing it off can cause problems.
If the update still fails
If you have plenty of real free space and the update still fails, space may not be the problem. Restart and try once more from System Settings > General > Software Update.
Apple's guide for when an error occurred while updating or installing macOS covers the next steps, including reinstalling from macOS Recovery.
Keep enough space for future updates
Updates come several times a year. Keeping free space as a habit means you will not hit this again.
- Keep 15 to 20 percent of your disk free. It helps updates and day-to-day speed.
- Delete installers after upgrading. They are rarely needed again.
- Check storage before big updates. A few minutes of cleaning beats a failed install.
If your Mac has a small disk, our guide to planning storage for local AI has tips that apply to any large files, such as using an external SSD.
How Purgy makes room for a macOS update
When an update needs space now, Purgy covers steps 1, 2, 4 and 5 above in one scan.
- Old installers. Purgy finds
Install macOSapps in Applications and.dmgand.pkgfiles in Downloads under Old macOS installers, ticked by default. An old macOS installer alone is often more than 12 GB. - Caches and logs. These are ticked too, and freed outright, so the space is available straight away without emptying the Trash.
- Local snapshots. They are listed under Backups & old tool data, unticked. If you tick them, Purgy removes them with Apple's
tmutilcommand. macOS makes new ones on its own schedule. - The Trash. Purgy's Trash screen shows what is already there and empties it after asking you.
Then restart, as in step 3, and try the update again. Purgy cannot free purgeable space directly or shrink macOS itself, and it does not download updates. Make room before your next update with the free trial.
Questions people ask about update space
These come up most when an update will not install.
Why does my Mac say there is not enough space when Finder shows plenty?
Finder counts purgeable space as available. The installer often does not. Delete snapshots, empty the Trash and restart to turn it into real free space.
Is it safe to delete the "Install macOS" app?
Yes, after the upgrade is done. It is only the installer. You can download it again from the App Store or Software Update if you ever need it.
Will deleting snapshots affect my backups?
No. Local snapshots are separate from the backups on your Time Machine drive, which stay as they are.
Can I free space just for the update and put things back later?
Yes. Moving large personal files to an external drive for the update is a good approach. Copy them back afterwards if you want them on your Mac.
Does the update itself take space after installing?
Briefly. macOS removes most of the installer files once the update finishes. Free space usually recovers within a day.
Can I install the update on a Mac with an almost full disk?
Not reliably. Updates need working space to unpack and keep a safe copy of the old system. Free up space first; it avoids a failed or very slow update.
How do I check free space before updating?
Run df -h / in Terminal and look at the Avail column, or check Storage settings and leave a generous margin above the update size.