Homebrew Cache Cleanup on Mac: brew cleanup Explained
On this page
- Where does Homebrew store its cache?
- How much space is Homebrew using?
- What does brew cleanup remove?
- How to run brew cleanup safely
- How to clear the whole Homebrew cache
- Remove packages you no longer use
- Cleaning up casks and the apps they install
- Is it safe to delete the Homebrew cache?
- How to keep Homebrew tidy automatically
- Two copies of Homebrew after moving to Apple Silicon
- Common problems after cleaning Homebrew
- Other developer caches worth checking
- How Purgy handles the Homebrew cache
- Questions people ask about Homebrew storage
Quick answer: Run brew cleanup to remove old versions of installed packages and old downloads. Run brew cleanup --prune=all to empty the whole download cache.
Add -n first, as in brew cleanup -n, to see what would be removed without deleting anything. Both are safe; Homebrew downloads files again when it needs them.
Homebrew is the most popular way to install command-line tools and apps on a Mac. It is also good at keeping things around. Old versions of packages stay installed after an upgrade, and every download is kept in a cache.
On a Mac that has used Homebrew for a few years, it is normal for these leftovers to reach several gigabytes. This guide shows where they are and how to clear them without breaking anything.
Where does Homebrew store its cache?
Homebrew keeps downloaded files in its own cache folder in your user Library. You can ask Homebrew for the exact path:
brew --cacheOn most Macs this prints ~/Library/Caches/Homebrew. It holds the bottles (prebuilt packages) and cask installers Homebrew downloaded, including old ones.
Installed packages live somewhere else, under Homebrew's prefix. That is /opt/homebrew on Apple Silicon Macs and /usr/local on Intel Macs. Each formula has a folder in Cellar, with one subfolder per installed version.
How much space is Homebrew using?
Measure first, so you know whether a cleanup is worth it. These commands only read; they do not change anything.
du -sh "$(brew --cache)"
du -sh "$(brew --prefix)/Cellar"
du -sh "$(brew --prefix)/Caskroom"
The first line is the download cache. The second is every installed formula, including old versions. The third is installed casks, which are usually apps.
To see which formulas take the most room:
du -sh "$(brew --prefix)"/Cellar/* | sort -hr | head -15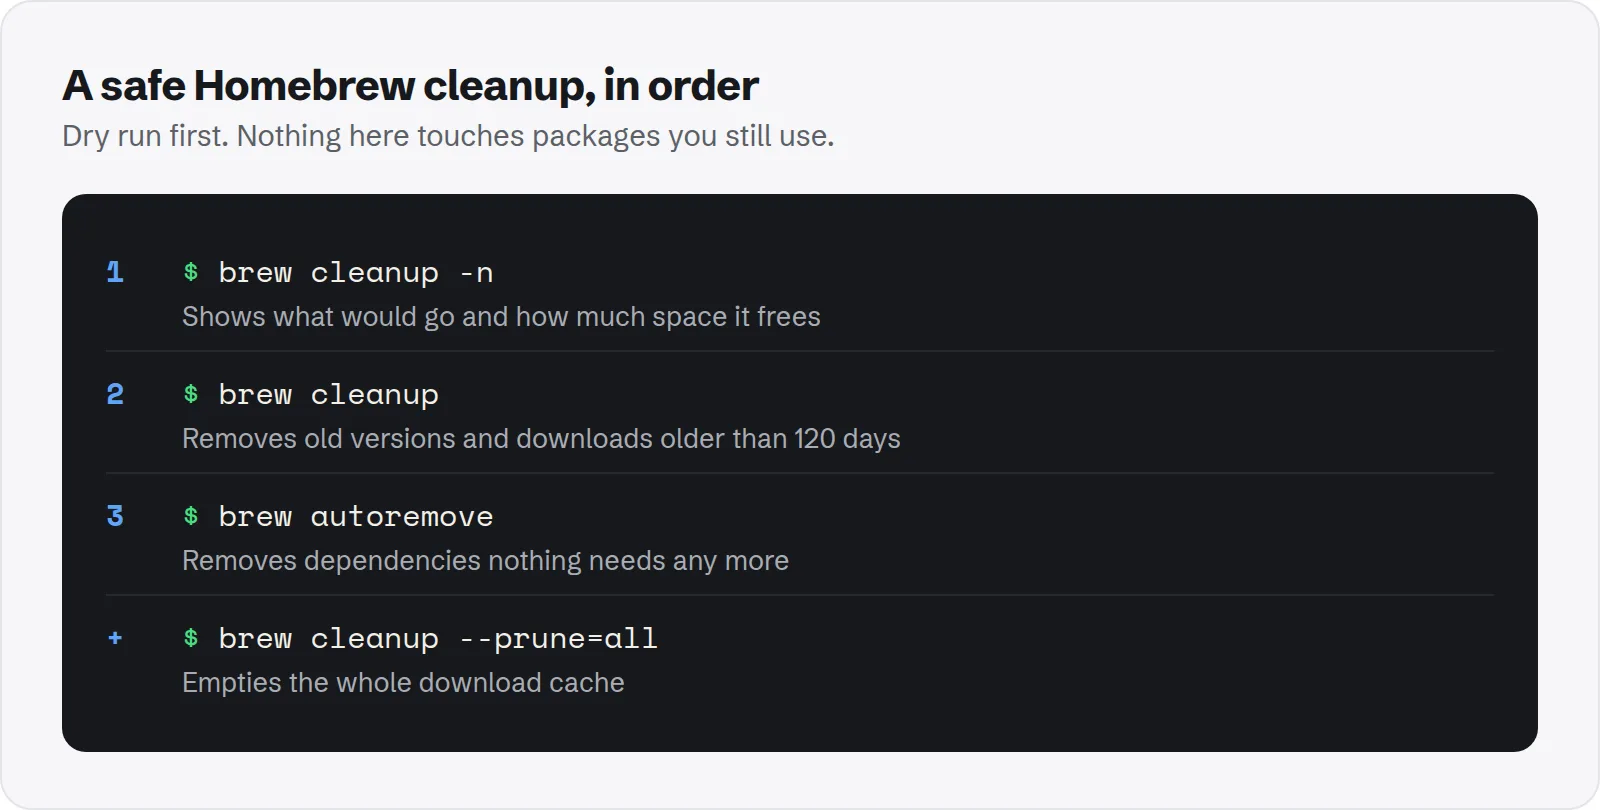
What does brew cleanup remove?
brew cleanup does two jobs in one command. It is safe to run any time, and Homebrew already runs a version of it on its own now and then.
- Old versions: when you upgrade a package, the previous version can stay in the Cellar. Cleanup removes versions you no longer use.
- Old downloads: cached files older than a set age, which is 120 days by default, are removed from the cache.
It does not remove packages you have installed, and it does not touch your settings or data. Anything it deletes can be downloaded again.
How to run brew cleanup safely
Start with a dry run. It lists everything that would be removed and how much space you would get back, without deleting a thing.
brew cleanup -nIf the list looks right, run it for real:
brew cleanupTo clean a single package and its old versions only, add its name, for example brew cleanup node.
How to clear the whole Homebrew cache
The default cleanup keeps recent downloads, in case you need to reinstall something soon. If you want every cached download gone, use the prune option:
brew cleanup --prune=allThere is also a scrub option, brew cleanup -s, which removes cached downloads even for the latest versions. The Homebrew manual describes every option in detail.
You can also delete the cache folder by hand. It is safe, because Homebrew creates it again:
rm -rf "$(brew --cache)"Remove packages you no longer use
Cleanup only removes old versions. The bigger win is often removing packages you installed once and forgot about. Homebrew can help you find them.
List the packages you installed yourself, as opposed to ones pulled in as dependencies:
brew leavesUninstall anything you do not recognise or no longer use, for example brew uninstall imagemagick. Then remove dependencies that nothing needs any more:
brew autoremoveRun brew autoremove -n first if you want to see the list before anything goes.
Cleaning up casks and the apps they install
Casks are apps installed through Homebrew, such as browsers or editors. Uninstalling a cask removes the app, but the app's own settings and caches in your Library usually stay behind.
Many casks support a deeper uninstall that removes those files as well:
brew uninstall --cask --zap firefoxBe careful with --zap. It removes the app's settings and data folders, so only use it when you are sure you want everything gone.
Is it safe to delete the Homebrew cache?
Yes. The cache holds copies of files Homebrew downloaded from the internet. Nothing in it is needed for your installed tools to run.
The only cost is time. If you later reinstall or downgrade a package, Homebrew downloads it again instead of using the cached copy.
The Cellar is different. Do not delete folders in the Cellar by hand. Use brew uninstall and brew cleanup, so Homebrew keeps its records and links in order.
How to keep Homebrew tidy automatically
Homebrew already cleans up a little on its own. When you install or upgrade, it removes old versions of the packages involved, and it runs a broader cleanup periodically.
You can make the cache shorter-lived by setting how many days Homebrew keeps downloads. Add this line to your ~/.zshrc to keep only the last 30 days:
export HOMEBREW_CLEANUP_MAX_AGE_DAYS=30If you set HOMEBREW_NO_INSTALL_CLEANUP at some point, automatic cleanup is turned off. Remove that line if you want it back.
A good routine is to run these three together every month or two:
brew update && brew upgrade
brew autoremove
brew cleanup
Two copies of Homebrew after moving to Apple Silicon
If you moved from an Intel Mac to an Apple Silicon Mac with Migration Assistant, you may have two Homebrew installs without knowing it.
The old Intel copy lives in /usr/local and runs under Rosetta. The native copy lives in /opt/homebrew. Each has its own Cellar, so the same tools can be installed twice.
Check which ones exist:
ls /usr/local/Homebrew /opt/homebrew 2>/dev/null
du -sh /usr/local/Cellar /opt/homebrew/Cellar 2>/dev/null
If both show up and your shell uses /opt/homebrew, the Intel copy is probably unused. Before removing it, list what it has installed with /usr/local/bin/brew leaves, and reinstall anything you still need with the native brew.
Then remove the old copy with Homebrew's official uninstall script, run against /usr/local. On some Macs this frees several gigabytes, because every tool was installed twice.
Common problems after cleaning Homebrew
Cleanup rarely breaks anything, but a few things can look odd at first. Each has a quick fix.
- A tool reports a missing library: something linked against an old version that was removed. Run
brew reinstallwith the tool's name. - brew doctor shows warnings: run
brew doctorand follow its suggestions. Most are about old links that cleanup left behind. - A pinned package was not cleaned: pinned packages are skipped on purpose. Unpin with
brew unpinif you want them included.
Other developer caches worth checking
If Homebrew had gigabytes of leftovers, other developer tools probably do too. The JavaScript ecosystem is a common one.
See how to find and delete all node_modules folders for project dependencies and npm, pnpm and Yarn caches. Apple developers should also check old iOS simulators and runtimes.
Many of these folders end up in the System Data total in macOS Storage settings. If that figure is still high, see how to clear System Data on Mac.
How Purgy handles the Homebrew cache
Homebrew keeps its downloads in ~/Library/Caches/Homebrew, inside your normal caches folder. Purgy lists it under System caches with its size, ticked by default, and frees it when you press Clean now. Homebrew downloads any bottle again if it ever needs one, so nothing installed is affected.
Purgy does not replace brew cleanup. Old versions of installed packages live in Homebrew's own Cellar, and only Homebrew knows which versions are still linked, so keep running brew cleanup and brew autoremove for those.
Where Purgy adds something is the rest of your developer setup. The same scan finds the npm, Yarn, pnpm, Gradle, Cargo and conda caches and Xcode's build data, and lists node_modules and Rust target folders for you to review.
If you installed an app with brew install --cask and want it gone, uninstall it with Homebrew first, then let Purgy's Uninstall apps screen or Review list catch any leftover caches.
See what Homebrew and your other tools are holding with the free trial.
Questions people ask about Homebrew storage
These come up often when people check Homebrew's size for the first time.
Does brew cleanup uninstall anything I use?
No. It only removes old versions and old downloads. Every package you have installed stays installed, at its current version.
Why is my Cellar so big after cleanup?
Cleanup does not remove packages, only their old versions. Large toolchains, such as compilers, language runtimes and their dependencies, are big by nature. Use brew leaves to find ones you no longer need.
Is it safe to delete /opt/homebrew?
Only if you want to remove Homebrew completely. Doing so removes every tool you installed with it. Homebrew provides an official uninstall script for that, which is cleaner than deleting the folder by hand.
Does the Homebrew cache count as System Data?
Usually, yes. macOS files hidden folders in your Library, including ~/Library/Caches/Homebrew, under the System Data total in Storage settings. Clearing the cache lowers that number.
How often should I run brew cleanup?
Once a month is plenty for most people. If you upgrade often or have little free space, run it after every brew upgrade.
Where do cask app settings go after uninstall?
They stay in your Library, usually in Application Support, Caches and Preferences. Use --zap when uninstalling to remove them, or delete them by hand if you know which folders belong to the app.